
This tutorial is a part of the Getting started series — Day 1, Week 1, Month 2.
The problem: one laptop holds the whole project
It's Monday. The designer is at a conference, the programmer is on another machine, and you're the producer who needs to read the enemy roster before the noon review. What you get is a promise: "I'll send you the folder tonight." Meanwhile three conversations happen about a design only one person can open.
The design isn't the problem. The container is. As long as the project lives in one person's user folder, every question about it becomes a request to that person - and no question can be asked in parallel.
There's more than one way to fix that, and the cheapest one requires nobody to install anything.
So what is IMS Creators?
If you have never used it: IMS Creators is one workspace where the design, the game data, the tasks and the people live together — "design, balance, tasks, and people in one place."
It exists because making a game usually means running five tools at once. The GDD lives in a wiki, the balance in a spreadsheet, the tasks in a tracker, and nobody can see the whole picture. This is one system instead of that pile — and it comes in two forms that are the same system: the cloud workspace you open in a browser (what this article is about), and the desktop app, which is free forever, open source (MIT), works fully offline and needs no account, for when you want the files on your own disk.
What you actually get, in benefit order:
- The design becomes data, not a wall of text. Characters, enemies, items and mechanics are entities with typed properties that reference each other. Change a value once and everything depending on it stays consistent.
- Your game becomes a database you can look at. A whole collection of cards or enemies as a table you can filter, sort and batch-edit - instead of opening forty files to answer one question.
- Game-specific content is built in, not bolted on. Tables, checklists, dialogue trees and level maps live inside the design document.
- Balance reaches your engine without retyping. Export to JSON or CSV shaped for Unity, Unreal or Godot, so nobody copies numbers by hand.
- The AI reads your real project. A built-in assistant answers questions from the actual structure, and a local MCP server points tools like Cursor or Claude at your design - with your own model if you want, even fully local.
- The team gets a place to work. Boards, roles, granular access and change history, so feedback and decisions have somewhere to live.
Reduced to one line: nobody retypes a number, and nobody has to ask which version is current.
Most of that needs only one thing — a project that isn't tied to a single machine. And getting one takes nothing more than opening a browser tab.
What a cloud project is (and what it isn't)
A cloud project is not an import of your desktop folder, and it is not a read-only viewer. It is the same project - the same structured elements, properties and references - held in your workspace and opened in a tab.
Concretely, the first area you land in is Gamedesign (gdd), which is the project root. Folders you create inside it are real folders. Elements you create are typed elements with real properties, exactly as on the desktop. Nothing is flattened into prose, nothing is converted on the way in.
Which is a short list of clicks. Let's start.
Step 1: name the project and pick a starter template
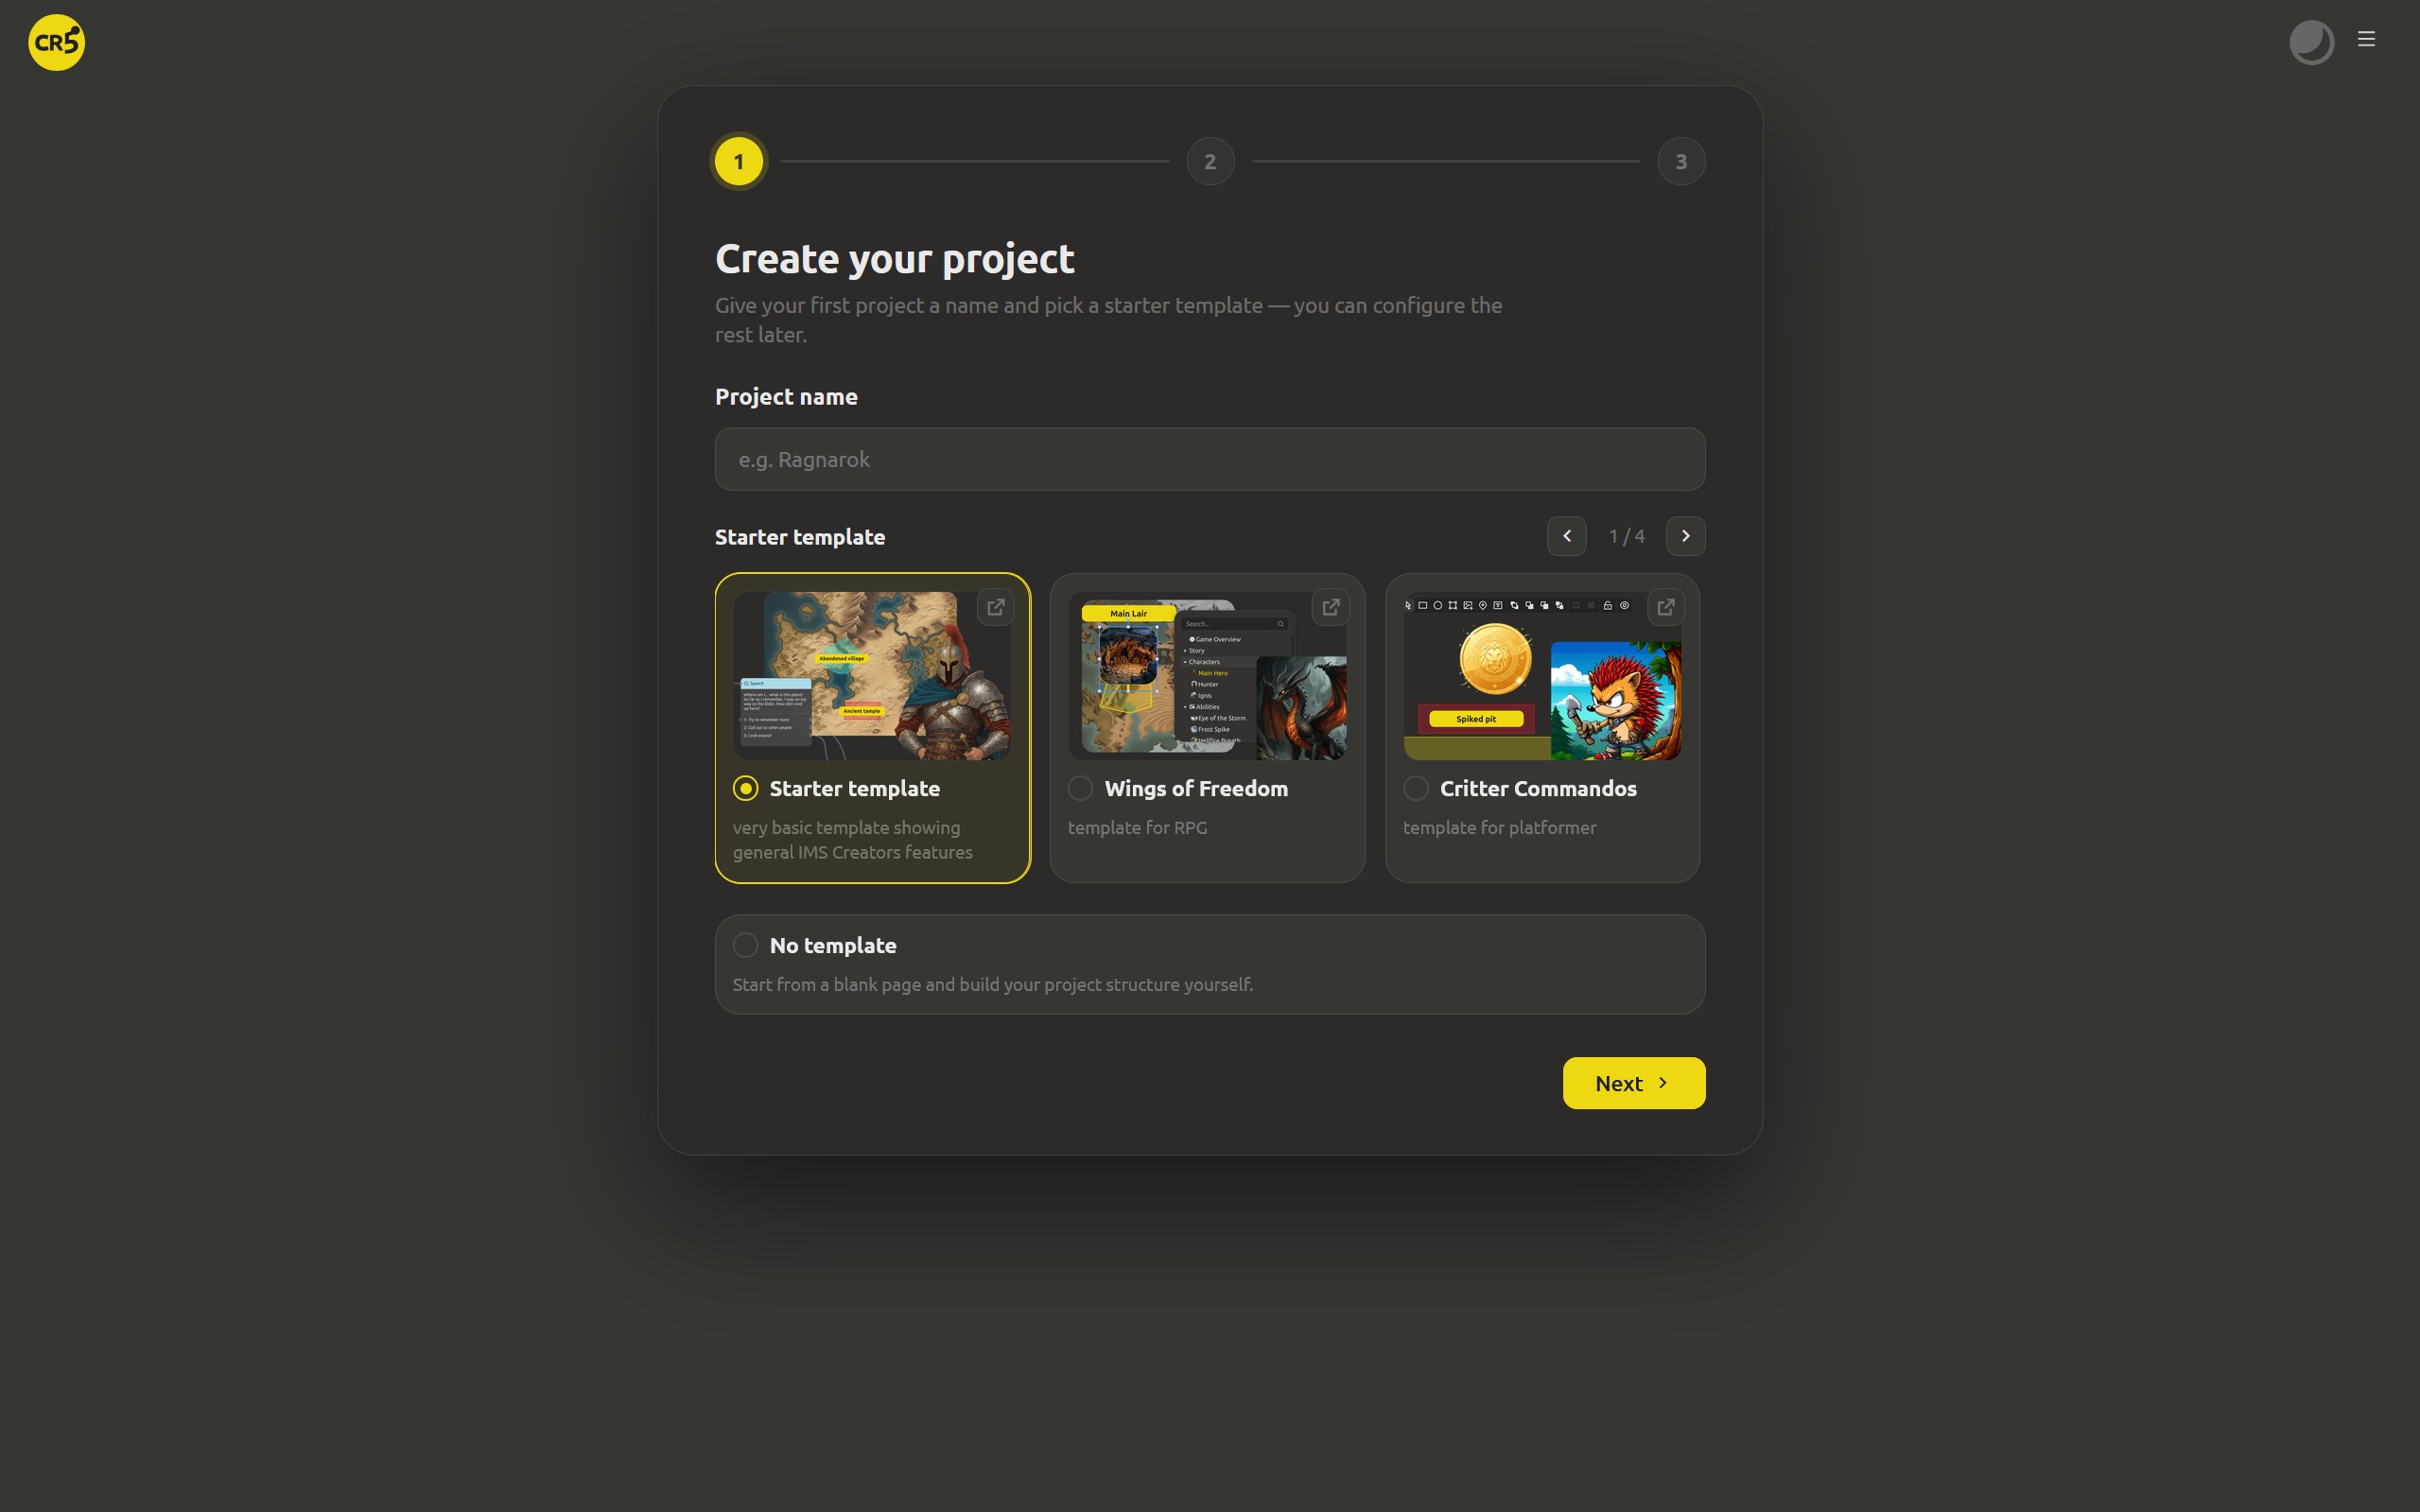
Open https://ims.cr5.space/app/try. There is no account wall and no long form - just three short steps, and the first one is already waiting: "Create your project" - "Give your first project a name and pick a starter template - you can configure the rest later."
Two things to set:
- Project name - use the name your team already says out loud; in this series it's the dead-mall roguelike from Month 1.
- Starter template - browse the templates and open any of them in a new tab to look inside before committing. The last option is always "No template" - "Start from a blank page and build your project structure yourself."
Take the "No template" card - deliberately. An empty project is exactly what this series needs: later this week we connect the folder you already built on disk, the Dead Mall local project from Month 1, and its Enemies, Cards and Characters arrive here on their own. Starting empty keeps that merge clean - there is no template structure to reconcile afterwards.
Then press Next.
The name is not permanent either. Project settings has a General information page with an editable project title, so if your team settles on a different name later, you change it there rather than recreating anything.
Step 2: create the account
Step two is "Create an account" - "Takes less than a minute. An account lets you store projects in the cloud and work as a team." You need three things: an email, a user name and a password.
The user name is the one worth thinking about. It is what your teammates see on cards and comments, so pick the human one rather than a handle.
You do have to agree to the terms and the privacy policy to create an account. If you already have one, sign in instead of making a duplicate - and you can skip this step entirely.
Step 3: activate the trial - and the project appears
Step three states the arrangement plainly: "A subscription is required for cloud projects" - "Try all the features for free: activate a 30-day trial - no credit card required."
The trial is what most people want here:
- 30-day trial - "Get Cloud benefits for 30 days" - activate it and the project is created for you.
- or pay: Cloud subscription - "For teams tuning game data together - shared entities, live edits, and engine export, with a 30-day free trial." It is priced per teammate, and you choose how many seats you need and whether to pay monthly or annually.
Buying opens checkout in a new tab, so when the payment finishes you come back and press Create project. Wait for the payment to be confirmed before you do.
And there is an honest third door on this screen, for anyone who is solo or doesn't need cloud access at all: "Download the free desktop app" - the MIT-licensed version that works offline forever. Pricing for everything else is under View all plans.
Step 4: build the first real thing
Don't stop at an empty project. Do one concrete action that proves the browser is a real editor:
- Create element → pick Markdown → type a name → write something you actually need. A one-page pitch, the enemy list, the design pillars.
- Create a typed element for something the game will really have - an enemy, a card - and fill two or three properties.
- Open the element, save it, and reopen it in a second browser tab. It's there, because it was never on your machine to begin with.
That last step matters more than it sounds. It removes the reason the team was stuck: the design no longer depends on whose device is holding it.
What you've actually gained
The project is now openable by a link, which quietly makes several other things cheaper:
- You can invite people instead of forwarding files.
- You can connect the desktop folder you already have, without giving up files on your disk.
- The work can become visible on a board, instead of living in a chat thread - and that one is next week.
None of that needed a new tool or a migration. It needed a different home for the same data.
What's next: a tour of what you just created
A new project has several areas, and only one of them is obviously the design. Tomorrow you'll get a guided tour of each one - so you know exactly which screen answers which question from day one.
Try it now: open https://ims.cr5.space/app/try, name the project, take the 30-day trial, and write one page of your real design in it. Five minutes now, and tomorrow you can read it from anywhere.
FAQ
Do I need to install anything to design in the browser?
No. The web app runs in a browser tab. The desktop app is the offline-first option - you can use both, and sync links them later in the week.
Is a cloud project a copy of my desktop project?
No, and at this stage there is no desktop project involved. A cloud project holds the same kind of structured data as a local one. Connecting a local folder is a separate, later step - and even then, nothing is converted or duplicated.
What is the difference between the project areas?
Gamedesign (gdd) is the design itself and the project root. The others - Tasks, Discussions, About, Settings, Planning - are the project around the design, and they exist in the cloud version. That distinction matters, because the desktop app only has the design area.
Do I need a credit card for the PRO trial?
No. Step 3 says it directly: "Try all the features for free: activate a 30-day trial - no credit card required." Nothing is charged, and your local files remain yours either way.
What happens to the project if I do not upgrade?
You keep the ability to get your data out. When a subscription ends, the cloud workspace stays available in read-only mode so you can export everything - and the desktop app keeps working for free, forever, on the files you own. Full pricing details live at https://ims.cr5.space/en/pricing.